/*
actionName: Name of action
param: param is an object that contians the parameter needed to be passed to the calling action.
e.g
var param = {
    param1: "this is string parameter",
    param2: false,// boolean
};
*/
function callGlobalAction(actionName, param) {
    var serverURL = Xrm.Page.context.getClientUrl();
    var result = null;
    var req = new XMLHttpRequest();
    req.open("POST", serverURL + "/api/data/v8.0/" +actionName, false);
    req.setRequestHeader("Accept", "application/json");
    req.setRequestHeader("Content-Type", "application/json; charset=utf-8");
    req.setRequestHeader("OData-MaxVersion", "4.0");
    req.setRequestHeader("OData-Version", "4.0");
    req.onreadystatechange = function () {
        if (this.readyState == 4) {
            req.onreadystatechange = null;
            if (this.status == 200) {
                result = JSON.parse(this.response);
            } else if (this.status == 204) {
                console.log("Request executed successfully without a response");
            } else {
                var error = JSON.parse(this.response).error;
                alert(error.message);
            }
        }
    };
    if (param) {
        req.send(window.JSON.stringify(param));
    } else {
        req.send();
    }
    return result;
}
Calling Global Action using Web API
Following is detail sample JavaScript code to call a global Action using Web API in Dynamics CRM.
Calling entity based Action using Web API
Following is detail sample JavaScript code to call an entity based Action using Web API in Dynamics CRM.
/*
actionName: Name of action
entityPlurarName: entityPlurarName is the plural entity logical name of entity e.g for account it is accounts. for opportunity it is opportunities
entityId: guid of record going to update
param: param is an object that contians the parameter needed to be passed to the calling action.
e.g
var param = {
    param1: "this is string parameter",
    param2: false,// boolean
};
*/
 function callEntityBasedAction(actionName, entityPlurarName, entityId, param) {
    var serverURL = Xrm.Page.context.getClientUrl();
    entityId = entityId.replace('{', '').replace('}', '');
    var result = null;
    var req = new XMLHttpRequest();
    req.open("POST", serverURL + "/api/data/v8.0/"+ entityPlurarName + "(" + entityId + ")/Microsoft.Dynamics.CRM." + actionName, false);
    req.setRequestHeader("Accept", "application/json");
    req.setRequestHeader("Content-Type", "application/json; charset=utf-8");
    req.setRequestHeader("OData-MaxVersion", "4.0");
    req.setRequestHeader("OData-Version", "4.0");
    req.onreadystatechange = function () {
        if (this.readyState == 4) {
            req.onreadystatechange = null;
            if (this.status == 200) {
                result = JSON.parse(this.response);
            } else if (this.status == 204) {
                console.log("Request executed successfully without a response");
            } else {
                var error = JSON.parse(this.response).error;
                alert(error.message);
            }
        }
    };
    if (param) {
        req.send(window.JSON.stringify(param));
    } else {
        req.send();
    }
    return result;
}
Dynamics CRM 2016 Web API (OData V4.0)
Microsoft introduces Web API (OData v4) with the release of Dynamics CRM 2016 to perform CRUD operations and also some other special operations. Following are some posts for CRUD operation...
Retrieve Record using Web API
Retrieve Multiple using Web API
Retrieve Multiple through fetch XML using Web API
Create Record using Web API
Update Record using Web API
Delete Record using Web API
Associate Record using Web API
Disassociate Record using Web API
Calling entity based Action using Web API
Calling Global Action using Web API
Disassociate Record using Web API
Following is detail sample code to disassociate a record using Web API in Dynamics CRM.
/*
currentEntityPlurarName: currentEntityPlurarName is the plural entity logical name of entity e.g for account it is accounts. for opportunity it is opportunities
currentEntityId: guid of current entity record
otherEntityPlurarName: otherEntityPlurarName is the plural entity logical name of entity e.g for account it is accounts. for opportunity it is opportunities
otherEntityId: guid of other entity record
*/
function disAssociateRequest(currentEntityPlurarName, currentEntityId, relationShipName, otherEntityPlurarName, otherEntityId) {
    var serverURL = Xrm.Page.context.getClientUrl();
    var query = currentEntityPlurarName + "(" + currentEntityId + ")/" + relationShipName + "/$ref?$id=" + serverURL + "/api/data/v8.2/" + otherEntityPlurarName + "(" + otherEntityId + ")";
    var req = new XMLHttpRequest();
    req.open("DELETE", serverURL + "/api/data/v8.2/" + query, true);
    req.setRequestHeader("Accept", "application/json");
    req.setRequestHeader("Content-Type", "application/json; charset=utf-8");
    req.setRequestHeader("OData-MaxVersion", "4.0");
    req.setRequestHeader("OData-Version", "4.0");
    req.onreadystatechange = function () {
        if (this.readyState == 4 /* complete */) {
            req.onreadystatechange = null;
            if (this.status == 204) {
                //alert('Record Disassociated');
            } else {
                var error = JSON.parse(this.response).error;
                Xrm.Utility.alertDialog(error.message);
            }
        }
    };
    req.send();
}
    var currentEntityName = "accounts";
    var currentEntityId = removeCurlyBraces(Xrm.Page.data.entity.getId())
    var relationShipName = "new_account_contact";
    var otherEntityName = "contacts";
    var otherEntityId = removeCurlyBraces(Xrm.Page.getAttribute("primarycontactid").getValue()[0].id);
    disAssociateRequest(currentEntityName, currentEntityId, relationShipName, otherEntityName, otherEntityId);
Associate Record using Web API
Following is detail sample code to Associate a record using Web API in Dynamics CRM.
/*
currentEntityPlurarName: currentEntityPlurarName is the plural entity logical name of entity e.g for account it is accounts. for opportunity it is opportunities
currentEntityId: guid of current entity record
otherEntityPlurarName: otherEntityPlurarName is the plural entity logical name of entity e.g for account it is accounts. for opportunity it is opportunities
otherEntityId: guid of other entity record
*/
function associateRequest(currentEntityPlurarName, currentEntityId, relationShipName, otherEntityPlurarName, otherEntityId) {
    var serverURL = Xrm.Page.context.getClientUrl();
    var associate = {}
    associate["@odata.id"] = serverURL + "/api/data/v8.2/" + otherEntityPlurarName + "(" + otherEntityId + ")"

    var req = new XMLHttpRequest();
    req.open("POST", serverURL + "/api/data/v8.2/" + currentEntityPlurarName + "(" + currentEntityId + ")/" + relationShipName + "/$ref", true);
    req.setRequestHeader("Accept", "application/json");
    req.setRequestHeader("Content-Type", "application/json; charset=utf-8");
    req.setRequestHeader("OData-MaxVersion", "4.0");
    req.setRequestHeader("OData-Version", "4.0");
    req.onreadystatechange = function () {
        if (this.readyState == 4 /* complete */) {
            req.onreadystatechange = null;
            if (this.status == 204) {
                //alert('Record Associated');
            } else {
                var error = JSON.parse(this.response).error;
                Xrm.Utility.alertDialog(error.message);
            }
        }
    };
    req.send(JSON.stringify(associate));
}
 var currentEntityName = "accounts";
var currentEntityId = removeCurlyBraces(Xrm.Page.data.entity.getId())
var relationShipName = "new_account_contact";
var otherEntityName = "contacts";
var otherEntityId = removeCurlyBraces(Xrm.Page.getAttribute("primarycontactid").getValue()[0].id);
associateRequest(currentEntityName, currentEntityId, relationShipName, otherEntityName, otherEntityId);
Delete Record using Web API
Following is detail sample code to delete a record using Web API in Dynamics CRM.
/*
entityPlurarName: entityPlurarName is the plural entity logical name of entity e.g for account it is accounts. for opportunity it is opportunities
id: guid of record going to delete
*/
function deleteRecord(entityPlurarName, id) {
    id = id.replace('{', '').replace('}', '');
    var IsDeleted = false;
    var serverURL = Xrm.Page.context.getClientUrl();
    var req = new XMLHttpRequest();
    req.open("DELETE", serverURL + "/api/data/v8.2/" + entityPlurarName + "(" + id + ")", false);
    req.setRequestHeader("Accept", "application/json");
    req.setRequestHeader("Content-Type", "application/json; charset=utf-8");
    req.setRequestHeader("OData-MaxVersion", "4.0");
    req.setRequestHeader("OData-Version", "4.0");
    req.send();
    if (req.readyState == 4 /* complete */) {
        if (req.status == 204) {
            IsDeleted = true;
        }
        else {
            var error = JSON.parse(req.response).error;
            Xrm.Utility.alertDialog(error.message);
        }
    }
    return IsDeleted;
}
var id=Xrm.Page.data.entity.getId();
alert(deleteRecord("accounts", id));
Retrieve Record using Web API
Following is detail sample code to retrieve a record using Web API in Dynamics CRM.
/*
entityName: entityName is the plural entity logical name of entity e.g for account it is accounts. for opportunity it is opportunities
entityId: Guid of entity record
return:-Entity record
*/
function retrieveEntityById(entityName, entityId) {
    entityId = entityId.replace('{', '').replace('}', '');
    var data = null;
    var req = new XMLHttpRequest();
    req.open('GET', Xrm.Page.context.getClientUrl() + "/api/data/v8.2/" + entityName + "(" + entityId + ")", false);
    req.setRequestHeader("Accept", "application/json");
    req.setRequestHeader("OData-MaxVersion", "4.0");
    req.setRequestHeader("OData-Version", "4.0");
    req.setRequestHeader("Prefer", "odata.include-annotations=*");
    req.send();
    if (req.readyState == 4 /* complete */) {
        if (req.status == 200) {
            data = JSON.parse(req.response);
        }
        else {
            var error = JSON.parse(req.response).error;
            console.log(error.message);
        }
    }
    return data;
}
var accountId=Xrm.Page.data.entity.getId();
var account=retrieveEntityById("accounts",accountId);
if(account!=null)
var accountName=account.name;
var accountNumber=account.accountnumber;
Update Record using Web API
Following is detail sample code to update a record using Web API in Dynamics CRM.
/*
entityPlurarName: entityPlurarName is the plural entity logical name of entity e.g for account it is accounts. for opportunity it is opportunities
id: guid of record going to update
entityObject: entityObject is an object that of entity contians fields and values that needed to be create.
e.g
  var entityObject = {};
      entityObject["originatingleadid@odata.bind"] = "/leads(" + guid + ")";  // lookup
      contact["firstname"] = string value;  // Single line of text
      contact["po_preferredlanguage"] = string value; //Option set
      contact["donotemail"] = true/false //two Option
*/
function updateRecord(entityPlurarName, id, entityObject) {
    var IsUpdated = false;
    var req = new XMLHttpRequest();
    req.open("PATCH", Xrm.Page.context.getClientUrl() + "/api/data/v8.2/" + entityPlurarName + "(" + id + ")", false);
    req.setRequestHeader("OData-MaxVersion", "4.0");
    req.setRequestHeader("OData-Version", "4.0");
    req.setRequestHeader("Accept", "application/json");
    req.setRequestHeader("Content-Type", "application/json; charset=utf-8");
    req.send(JSON.stringify(entityObject));
    if (req.readyState === 4) {
        if (req.status === 204) {
            IsUpdated = true;
        }
        else {
            var error = JSON.parse(req.response).error;
            Xrm.Utility.alertDialog(error.message);
        }
    }
    return IsUpdated;
}
var account = {};
account["name"] = "Test Account name 2";  // Single line of text
account["paymenttermscode"] = "4";//Text(Net 30) //Option set
account["creditonhold"] = false; //two Option
alert(updateRecord("accounts", removeCurlyBraces(Xrm.Page.data.entity.getId()), account));
Create Record using Web API
Following is detail sample code to create a record using Web API in Dynamics CRM.
/*
entityPlurarName: entityPlurarName is the plural entity logical name of entity e.g for account it is accounts. for opportunity it is opportunities
entityObject: entityObject is an object that of entity contians fields and values that needed to be create.
e.g
  var entityObject = {};
      entityObject["originatingleadid@odata.bind"] = "/leads(" + guid + ")";  // lookup
      contact["firstname"] = string value;  // Single line of text
      contact["po_preferredlanguage"] = string value; //Option set
      contact["donotemail"] = true/false //two Option
*/
function createRecord(entityPlurarName, entityObject) {
    var id = null;
    var req = new XMLHttpRequest();
    req.open("POST", Xrm.Page.context.getClientUrl() + "/api/data/v8.2/" + entityPlurarName, false);
    req.setRequestHeader("OData-MaxVersion", "4.0");
    req.setRequestHeader("OData-Version", "4.0");
    req.setRequestHeader("Accept", "application/json");
    req.setRequestHeader("Content-Type", "application/json; charset=utf-8");
    req.send(JSON.stringify(entityObject));
    if (req.readyState === 4) {
        if (req.status === 204) {
            var uri = req.getResponseHeader("OData-EntityId");
            var regExp = /\(([^)]+)\)/;
            var matches = regExp.exec(uri);
            id = matches[1];
        }
        else {
            var error = JSON.parse(req.response).error;
            Xrm.Utility.alertDialog(error.message);
        }
    }
    return id;
}
var account = {};
account["primarycontactid@odata.bind"] = "/contacts(" + removeCurlyBraces(Xrm.Page.getAttribute("primarycontactid").getValue()[0].id) + ")";  // lookup
account["name"] = "Test Account name";  // Single line of text
account["paymenttermscode"] = "1";//Text(Net 30) //Option set
account["creditonhold"] = true; //two Option
var accountid=createRecord("accounts", account);
Distribute Campaign Activity via “Email via Mail Merge”
We can distribute our campaign activity by “Email, Email via Mail Merge, Letter, Letter via mail merge, Fax, Fax via mail merge, phone call etc.”. When our channel is “[Email, Letter, Fax] via Mail Merge” then we cannot distribute the campaign activity in dynamics CRM web client, we need to distribute it from outlook client for dynamics CRM.
Create Mail Merge templates
Installing Outlook Client
Overview of Distributing Campaign Activity via “Email via Mail Merge” in CRM Outlook client.
Create a campaign activity with channel “Email via Mail Merge”.

If you try to distribute this campaign activity in Dynamics CRM web client then below alert will be shown.


Click Distribute Campaign Activity button, a dialog will appear, select your Mail Merge template and click download.


When activities are tracked in CRM, below alert will be shown.

When see in Activities pane in the campaign activity, the emails will be there against each member in marketing list.


Create Mail Merge templates
Installing Outlook Client
Overview of Distributing Campaign Activity via “Email via Mail Merge” in CRM Outlook client.
Create a campaign activity with channel “Email via Mail Merge”. 
If you try to distribute this campaign activity in Dynamics CRM web client then below alert will be shown.

So, here we need to distribute this Campaign activity in Outlook client for CRM. Go to Marketing | Marketing | Campaigns. Select your campaign record and double click to open.

Go down in your campaign form, open the campaign activity from the “Campaign Activity” sub Grid.

Click Distribute Campaign Activity button, a dialog will appear, select your Mail Merge template and click download.

The mail merge template will open in Microsoft word. Here you can change the content, preview document for each recipient. Click Finish & Merge | Send Email Messages.

Merge to E-mail dialog will be shown, put your subject line. And click ok.

Another dialog will be shown where you have more options. Click Ok to proceed.

When activities are tracked in CRM, below alert will be shown.

When see in Activities pane in the campaign activity, the emails will be there against each member in marketing list.

Here I have just open one email record to just confirm the content of the email.

Campaign Response
In Microsoft Dynamics CRM, campaign responses are records of the communication you receive from potential customers in response to a specific marketing campaign. There are four ways to create campaign responses:
Record campaign responses manually.
Convert an existing activity to a campaign response.
When a potential customer responds to an activity created for them as part of a marketing campaign, you can convert the corresponding activity, such as a phone call, e-mail, or fax etc., to a campaign response.

Automatically generate campaign responses.
Select “Yes” for “Create campaign responses for incoming e-mail” and click OK.

Overview of Auto Campaign Responses


After clicking the distribute button, the email will be send to each member in the marketing list.

The below highlighted email activities are created and sent to members in the marketing list.

Here you can see the responses when customers reply to the email.

Here the customer received the email.

Customer replied to this email.

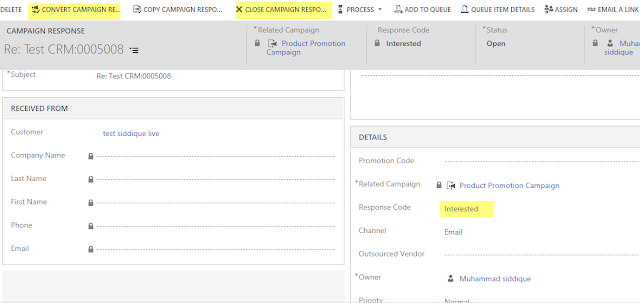
The campaign response is auto created when the customer replied to us.

When you open the Response, you can close or convert it.
Record campaign responses manually.
You can create responses manually by first creating an activity and then converting it, or by creating a new campaign response within a campaign record
Convert an existing activity to a campaign response.

Import responses from a file, such as a Microsoft Office Excel workbook.
By importing campaign responses, you can capture a record of the responses received as part of campaign efforts performed outside Microsoft Dynamics CRM. When you import the file, you can specify that it contains campaign responses.
Automatically generate campaign responses.
When customers respond to e-mail activities in your campaign, you can choose to have Microsoft Dynamics CRM create the corresponding campaign response records automatically.
Configure Auto Campaign Response Settings by Admin
1. Logon to Dynamics CRM with Administrator role.
2. Go to Settings | Administration and click on “System Settings”
3. Click on “Marketing” tab on System Settings dialog that gets launch


Select “Yes” for “Create campaign responses for incoming e-mail” and click OK.
Also you need to enable email tracking. For enabling email tracking, go to Email tab.

Overview of Auto Campaign Responses
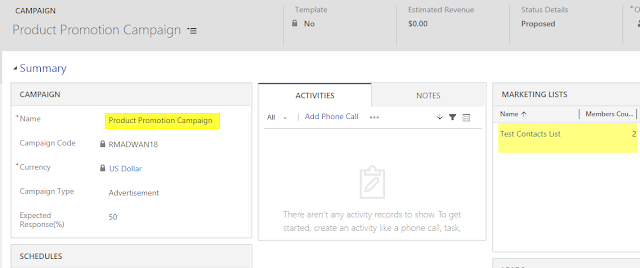
Create a Campaign and add a marketing list, this marketing list targeted contacts and having two members.
Add a Campaign Activity and select email as channel.

Add a Campaign Activity and select email as channel.

Click on “Distribute Campaign Activity” button below dialog will appear, add subject and Description or use template.

After clicking the distribute button, the email will be send to each member in the marketing list.

The below highlighted email activities are created and sent to members in the marketing list.

Here you can see the responses when customers reply to the email.

Here the customer received the email.

Customer replied to this email.

The campaign response is auto created when the customer replied to us.

When you open the Response, you can close or convert it.
Subscribe to:
Posts (Atom)